Making an audit against a smart contract is a great thing. However, finding vulnerabilities without fixing them is useless. Unfortunately, smart contracts are immutable by design, which means that once the smart contract is deployed, it cannot be changed. So how to fix a smart contract?
To fix a vulnerable smart contract you should follow the next steps:
Prepare your contract
Deploy your contract
Deploy the proxy
Connect your proxy to that contract
Deploy the new version
Connect the proxy to the new contract
Repeat 5 and 6 for every upgrade
Proxies are only one of the possible techniques to fix a smart contract. Here is the list of the different techniques that can be used to fix a smart contract once it gets deployed:
Social migration
Changing parameters
Deploy a proxy
CREATE2 deployment
In this blog post, we are going to mainly focus on the last two techniques as they are the more practical and most popular. You are going to see in detail and step by step what should be put in place to be able to upgrade and fix your smart contract once it gets deployed in the Blockchain.
This blog post will contain both technical and theoretical concepts to better understand the way smart contracts could be updated. In addition, I am going to give you as many examples as possible to get an idea about what your code may look like in the future. Moreover, you will see both the automatic and manual ways of deploying a proxy.
So if you are interested, please just keep reading and do not hesitate to leave a question below and I will do my best to respond.
How to correct my smart contract?
To fix a smart contract, you should first make it upgradable. Therefore, to make a smart contract upgradable a proxy should be put in place.
In this section, I will give you the most recommended and easy way of deploying upgradable smart contracts. All you have to do is to follow this section step by step and do not jump any word on it and you will be able to make any smart contract updatable. In addition, I will give you two ways of doing things, one manually by using Openzeppelin smart contracts in case you are working only with remix, and the second one is by using Hardhat.
The manual solidity proxy deployment technique
To implement a proxy for your smart contract manually all you have to do is to:
Deploy your smart contract
Deploy the proxy smart contract
Connect your proxy to that smart contract
The idea is that the proxy will be the interface seen by the users and its address is the one that will be distributed to the users. In addition, the proxy will be responsible for saving all the smart contract stat. However, all the business logic will be stored in the other smart contract that you will be able to upgrade whenever you want.
I do not recommend using this technique, because there are so many other security aspects that you should manually take care of, which increase the probability to do something wrong (check the end of this subsection).
Here is the step-by-step process to put in place a proxy for your smart contract:
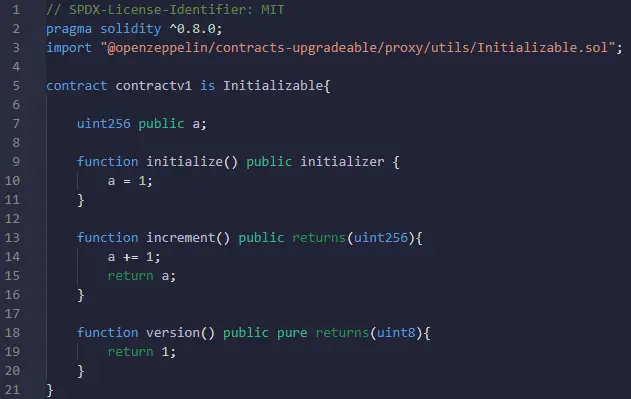
Step 1: Prepare your contract
To be able to modify your smart contract in the future, you should first prepare it to do so. Therefore, here are some key elements that your smart contract code should satisfy to be able to use proxies and upgrade them in the future:
No constructors can be used in upgradeable contracts
If you want to user constructor in your contract to initialize some variable you should instead inherit from the Initializable smart contract and use its initialize function.
The used smart contract libraries should also be upgradable (@openzeppelin/contracts-upgradeable)
Avoiding Initial Values in Field Declarations
Your smart contract should not use either selfdestruct or delegatecall
Here is a small example of such contract:
The initialize() function can be used to replace the constructor to be able to initialize some variables in the deployment phase. This is used because constructors are not allowed while working with proxies. The reason behind this restriction is that, if the contract has a constructor, then once it is deployed it will initialize the contract stat and not the proxies variables which are the ones clients interact with and change.
In addition, initializers are executed only once. This also means that this function will only be executed during the first deployment of the contract and the proxy. After that, the initializer function could not be called once again to reinitialize variables with different values even after deploying a new version of the contract.
If it exists in any smart contract, the initializer function should always be called, otherwise, the contract could be hacked.
Step2: Deploy your contract
Once the smart contract you want to upgrade in the future is well prepared, then you can now deploy it.
Step3: Deploy the proxy
Deploying a proxy is very easy with the Openzeppelin library. All you have to do is to download and deploy the TransparentUpgradeableProxy smart contract proxy. You can find this smart contract here:
To upgrade your smart contract all you should do is:
Deploy your new smart contract version
Call the TransparentUpgradeableProxy.upgradeTo(address_of_newContract)
And you will be able to communicate with the new contract with the same old address.
As you can see here, I didn’t put so many source code examples because there is nothing to build, all you have to do is to deploy and configure things. In addition, the proxy deployed in this example is called transparent (see below for more details).
Hardhat proxy deployment technique
When using Hardhat you have two options to automate the process of deploying a proxy. The first one is using the hardhat built-in plugin, or using the Openzeppelin plugin. In this blog post, we are going to use the Openzeppelin plugin.
To be able to use this plugin you should:
Step1: Add Openzeppelin plugin
In your hardhat.config.js file include the following line:
require('@openzeppelin/hardhat-upgrades');
If the Openzeppelin plugin is not yet imported into your project you can use the following command:
This code simply deploys your smart contract “contractv1” that takes 2 parameters param1 and param2 for its initializer function. Then deploy the proxy and connect it to your contract. Those three steps are all made by calling deployProxy() function.
The deployProxy() function can take also a third parameter which can be used to choose what kind of proxy you want to deploy. To learn more about the possible types of proxies, please take a look at the following section.
Step4: upgrade from contractv1 to contractv2
Once your smart contract proxy is deployed, upgrading to newer versions could be done using the following line of code:
proxyAddress is the address of the smart contract proxy.
The Openzeppelin plugin does pretty much the same job we did during the manual technique. However, the plugin adds some security concepts to the proxy, like creating a proxyAdmin contract to manage the proxy, and other things. Therefore, I highly recommend using this technique rather than doing it manually.
Upgrade smart contract using social migration
Social migration simply means deploying a whole new smart contract, migrating all the old smart contract stat to the new one, and then trying to convince the community to switch to it. This technique is efficient in terms of fixing the smart contract and adding more features.
However, it is complicated to first migrate all the stats of the old contract to the new one. In addition, it is not easy to convince the community that uses your smart contract to switch to the new one. Moreover, this technique is both time-consuming and may cost developers so much money to put in place.
Also, finding a critical vulnerability could happen just after you deploy your update, and it is not possible to perform a new update 1 day after convincing the community to switch.
With all these limitations, this technique could be feasible for smaller communities and may work better for them. In some cases, using this technique would be even more efficient than the others.
Upgrade smart contract by changing parameters
Changing the smart contract parameters is another way of updating or upgrading a smart contract. Upgrading a smart does not simply add or fix code, it could be as simple as changing a parameter in the smart contract to remove a business loss.
This technique usually does not require much time and money to deploy. However, this technique is very limited in terms of what can be fixed and will usually not be enough to fix discovered vulnerabilities.
Upgrade smart contract by deploying a proxy
The technique of upgrading smart contracts using proxies is based on the idea of creating an unchangeable smart contract that holds all the smart contract stats and uses delegatedcalls to execute the business logic stored in another contract. Using this technique the users will have one smart contract address to communicate with no matter what update the developers do.
Deploying a proxy for a smart contract is the most popular technique for upgrading a smart contract due to its efficiency to fix complex vulnerabilities and bugs without even changing the actual address of the smart contract. However, this technique also suffers from some limitations that should be worked around.
In this section, we are going to explain in detail, the most popular smart contract proxy standards and the idea that each one of them tries to implement and why.
The transparent proxy standard
Deploying a smart contract proxy comes with some technical problems related to how EVM works. One of the most popular problems that could lead to some serious security issues is the function clashes.
This problem happens when either two functions with whole different signatures have the same first 4bytes, or when the admin of the proxy calls a function that exists in both the proxy contract and the logic contract. In this situation, the EVM will execute the proxy function. Therefore, both the admin and the client will never be able to reach the function in the business logic contract.
The transparent proxy standard was introduced to solve this problem by making a separation between calls that came from the proxy admin and those that come from a user. The idea here is that every transaction that comes from the proxy admin will trigger functions held in the proxy contract and reject the other calls. In addition, the calls that came from simple users will be directly forwarded to the business logic contract even if it matches one of the proxy contract functions.
By implementing this concept the risk of having those confuses is reduced. However, another problem arises. The fact that all the proxy admin calls are matched to the proxy contract only, then if the admin tries to communicate with the logic contract, all his transactions will be reverted. However, this problem could easily be solved, by creating a dedicated admin account that can even be a smart contract, which is what the Openzeppelin plugin exactly does.
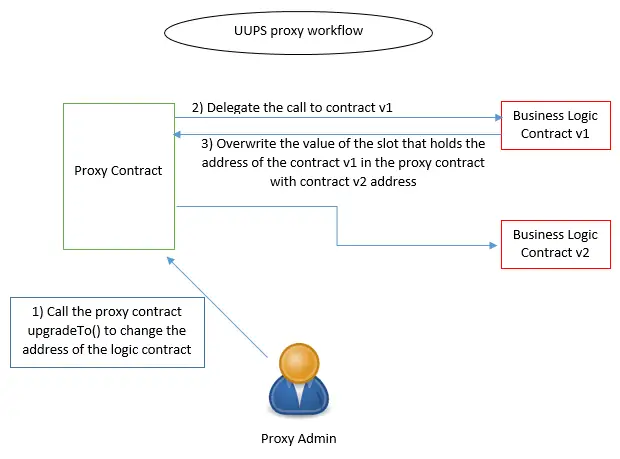
Universal upgradeable proxy standard (UUPS)
Globally UUPS and transparent proxies have the same functionalities in terms of delegating calls and the proxy core that they inherit from. However, the main difference between them is the fact that transparent proxies are upgradable by default. This means that they hold the upgradability functions in their source code, which makes them more expensive. Contrarily to the transparent proxies, UUPS proxies give the logic holding smart contract the obligation to handle the upgradability by implementing a function that changes the UUPS proxy data slot that holds the business logic contract address. Here is an image that better describe these two concepts:
Transparent solidity proxy workflow
UUPS solidity proxy workflow
Both proxies still exist in the Openzeppelin repository. However, Openzeppelin recommends switching the UUPS proxy. For more details about these two concepts take a look at the following link.
Upgrade smart contract by deploying it with CREATE2
The last technique we are going to discuss in this blog post is the CREATE2 technique to upgrade a contract. The name of this technique comes from the EVM opcode CREATE2 which was introduced in February 2019.
The CREATE opcode allows developers to deploy smart contract in the Blockchain and return the address where it was generated. The address is generated using the following:
new_address = hash(sender, nonce)
Unlike the CREATE opcode, the CREATE2 allows developers to specify where exactly they want to deploy their smart contract (at which address). More details about this opcode could be found here.
Using the CREATE2 opcode instead of the CREATE introduces so many abilities to the developers. One of those abilities is to upgrade the smart contract without changing its address.
The idea behind this technique is to call the self-destruct function in the contract you want to upgrade then use the same address to deploy the new one using the CREATE2 opcode.
The contract that was deployed suing CREATE2 and holds a self-destruction function are called metamorphic contracts. This type of contract solves the issue of upgradability and vulnerability patching in a smart contract but also introduces a whole new danger.
Imagine that after investing your money in a protocol, the next day you wake up you check the smart contract address you sent your money to it, and you discover that all the source codes have changed. Moreover, you discover that the admin has now the ability to drain all your money anytime he wants and that you simply cannot withdraw back your coins.
Therefore, I highly do not recommend using this technique for both the danger that it represents for users and the contract itself that uses the self-destruction function. In addition, this technique can be used in honeypots to steal users funds.
If you want to know more about the kind of vulnerabilities that you can fix in a smart contract I highly recommend taking a look at the following blog posts:
I am a Cyber Security Expert, I have worked with many companies around the globe to secure their applications and their networks. I am certified OSCP and OSCE which are the most recognized and hard technical certifications in the industry of cybersecurity. I am also a Certifed Ethical hacker (CEH).
I hope you enjoy my articles :).
To be able to perform the different tasks and execute the operations in its source code, smart contracts require a certain level of gas. This gas is paid by the ...
Undoubtedly, ChatGPT stands out as one of the most remarkable inventions of 2021. Its wide-ranging capabilities and applications have opened up endless possibilities for human interaction and problem-solving. Furthermore, certain [...]
We use cookies on our website to give you the most relevant experience by remembering your preferences and repeat visits. By clicking “Accept”, you consent to the use of ALL the cookies.
This website uses cookies to improve your experience while you navigate through the website. Out of these, the cookies that are categorized as necessary are stored on your browser as they are essential for the working of basic functionalities of the website. We also use third-party cookies that help us analyze and understand how you use this website. These cookies will be stored in your browser only with your consent. You also have the option to opt-out of these cookies. But opting out of some of these cookies may affect your browsing experience.
Necessary cookies are absolutely essential for the website to function properly. This category only includes cookies that ensures basic functionalities and security features of the website. These cookies do not store any personal information.
Any cookies that may not be particularly necessary for the website to function and is used specifically to collect user personal data via analytics, ads, other embedded contents are termed as non-necessary cookies. It is mandatory to procure user consent prior to running these cookies on your website.


Post comments (0)